TheHive — Standalone Server Installation Guide
Overview
This guide walks you through setting up TheHive on a single standalone server — the most straightforward deployment model, ideal for smaller teams or lab/testing environments. All components run on one machine, which simplifies management while keeping everything self-contained.
Before diving in, it's worth understanding what you're actually installing and why each piece matters.
Architecture
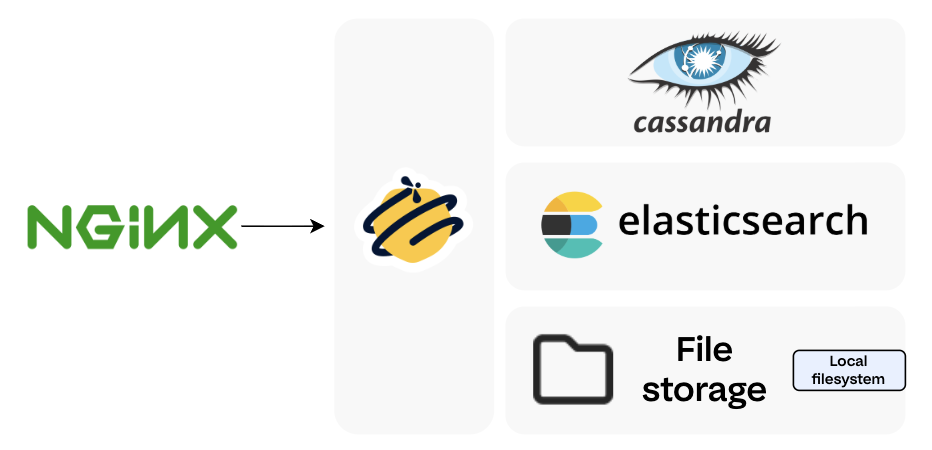
A standalone TheHive deployment consists of the following components running together on a single server:
| Component | Role |
|---|---|
| Apache Cassandra | The primary database — stores all case data, alerts, users, and incident response records |
| Elasticsearch | The indexing engine — powers TheHive's fast search and query capabilities |
| Local filesystem | File/attachment storage (for standalone setups; clustered environments use NFS or S3-compatible storage) |
| TheHive | The application itself |
| Nginx (optional) | Reverse proxy for HTTPS termination |
For hardware and OS requirements before starting, refer to the TheHive System Requirements.
1. Install Required Dependencies
Start by making sure your system is up to date and has all the foundational packages TheHive and its components depend on. This includes build tools, Python utilities, certificate management packages, and more.
sudo apt update -y && sudo apt upgrade

sudo apt install git curl wget cmake gcc openssh-server openssh-client net-tools python3 python3-pip pipx build-essential plocate gnupg coreutils apt-transport-https ca-certificates ca-certificates-java software-properties-common lsb-release unzip -y
2. Set Up the Java Virtual Machine (JVM)
TheHive is a Scala/Play application — it runs on the JVM. Specifically, it requires Java 11, and we'll be using Amazon Corretto, a production-ready, no-cost distribution of OpenJDK maintained by AWS. It's well-tested, LTS-supported, and a solid choice for server deployments.
Install Java 11 (Amazon Corretto)
wget -qO- https://apt.corretto.aws/corretto.key | sudo gpg --dearmor -o /usr/share/keyrings/corretto.gpg
echo "deb [signed-by=/usr/share/keyrings/corretto.gpg] https://apt.corretto.aws stable main" | sudo tee -a /etc/apt/sources.list.d/corretto.sources.list
sudo apt update
sudo apt install java-common java-11-amazon-corretto-jdk
echo JAVA_HOME="/usr/lib/jvm/java-11-amazon-corretto" | sudo tee -a /etc/environment
export JAVA_HOME="/usr/lib/jvm/java-11-amazon-corretto"
Verify the Installation
You should see output similar to:
Sample Output
Please Note:
If a different Java version appears (e.g., Java 17 or 21), set Java 11 as the default using sudo update-alternatives --config java.
TheHive has specific compatibility requirements and may not run correctly on other versions.
3. Install and Configure Apache Cassandra
Apache Cassandra is a distributed NoSQL database designed for high availability and scalability. TheHive uses it as its back-end datastore — all your cases, alerts, observables, and user data live here.
3.1. Install Cassandra
3.1.1. Add the Cassandra Repository
Cassandra isn't available in the default Ubuntu repos, so you'll need to add the official Apache repository.
a. Download and store the Cassandra repository signing key:
wget -qO - https://downloads.apache.org/cassandra/KEYS | sudo gpg --dearmor -o /usr/share/keyrings/cassandra-archive.gpg
b. Check whether the sources list file already exists. If it doesn't (which is typical on a fresh system), you'll create it in the next step:
analyst@analyst:~$ ls -la /etc/apt/sources.list.d/cassandra.sources.list
ls: cannot access '/etc/apt/sources.list.d/cassandra.sources.list': No such file or directory
c. Add the Cassandra 4.1.x repository:
echo "deb [signed-by=/usr/share/keyrings/cassandra-archive.gpg] https://debian.cassandra.apache.org 41x main" | \
  sudo tee -a /etc/apt/sources.list.d/cassandra.sources.list
3.1.2. Install Cassandra
3.1.3. Verify the Installation
If Cassandra is installed, the output will show service details including its current state. An error like "Unit not found" means the installation didn't complete successfully.
3.1.4. Set Data Directory Permissions
By default, Cassandra stores all its data in /var/lib/cassandra. Make sure the cassandra user owns this directory to prevent any permission-related issues down the line:
3.2. Configure Cassandra
Cassandra's main configuration lives in the cassandra.yaml file. Before starting the service, you'll want to set a cluster name and optionally adjust data directory paths.
-
Open the configuration file (making a backup first is always a good idea):
-
Key settings to configure:
a. Cluster Name — Change this from the default
Test Clusterto something meaningful for your environment. This name identifies your Cassandra cluster and should be consistent across all nodes if you ever scale out.b. Data Directories (optional) — The defaults below are fine for most setups, but if you're mounting dedicated storage volumes, you can redirect them here:
Parameter Default Path data_file_directories/var/lib/cassandra/datacommitlog_directory/var/lib/cassandra/commitlogsaved_caches_directory/var/lib/cassandra/saved_cacheshints_directory/var/lib/cassandra/hintsIf you change any of these paths, update permissions accordingly:
-
Enable Authentication (recommended) — By default, Cassandra allows unauthenticated connections. For any non-throwaway environment, you should enforce password authentication. Set the following values in
cassandra.yaml:
3.3. Start the Cassandra Service
If Cassandra started automatically before you finished configuring it, stop it and clear the existing data directories before proceeding — otherwise the cluster name change won't take effect cleanly.
# Check if it's already running
sudo systemctl status cassandra

# If running, stop it first
sudo systemctl stop cassandra
Then start, enable, and verify the service:
A green active (running) status means you're good to go.
Note:
Cassandra listens on port 9042/tcp by default for client connections.
3.4. Change the Default Cassandra Password
Note
Only required if you enabled authentication in Step 3.2.
Out of the box, Cassandra uses the credentials cassandra / cassandra. Leaving these in place is a significant security risk — change them immediately.
We'll use CQL (Cassandra Query Language) — the SQL-equivalent shell for interacting with Cassandra.
-
Connect using the default credentials:
Troubleshooting —
ModuleNotFoundError: No module named 'six.moves'analyst@analyst:/etc/cassandra$ cqlsh -u cassandra -p cassandra Traceback (most recent call last): File "/usr/bin/cqlsh.py", line 134, in <module> from cassandra.cluster import Cluster File "/usr/share/cassandra/lib/cassandra-driver-internal-only-3.25.0.zip/cassandra-driver-3.25.0/cassandra/cluster.py", line 33, in <module> ModuleNotFoundError: No module named 'six.moves'This is a common Python compatibility issue with some Cassandra installs.
If you see this error, install Python 3.9 and invoke
cqlshthrough it: -
Change the default password:
Press Ctrl+D to exit, then reconnect with your new password to confirm it works.
Example Output
analyst@analyst:/etc/cassandra$ sudo -u cassandra CQLSH_PYTHON=/usr/bin/python3.9 cqlsh -u cassandra -p cassandra

Warning: Using a password on the command line interface can be insecure.
Recommendation: use the credentials file to securely provide the password.

Connected to Soc at 127.0.0.1:9042
[cqlsh 6.1.0 | Cassandra 4.1.10 | CQL spec 3.4.6 | Native protocol v5]
Use HELP for help.
cassandra@cqlsh> ALTER USER cassandra WITH PASSWORD 'SoCAdm1n@@1337';
cassandra@cqlsh>
3.5. Create a New Administrator Role
Note
Only required if you enabled authentication in Step 3.2.
Rather than relying on the built-in cassandra superuser indefinitely, it's best practice to create a named admin role and then remove the default account. This gives you better audit traceability and reduces reliance on well-known default credentials.
-
Create the new admin role:
CREATE ROLE admin WITH PASSWORD = '<authentication_admin_password>' AND LOGIN = true AND SUPERUSER = true;Press Ctrl+D to exit, reconnect as
admin, then drop the default user:
Example Output
analyst@analyst:/etc/cassandra$ sudo -u cassandra CQLSH_PYTHON=/usr/bin/python3.9 cqlsh -u cassandra -p SoCAdm1n@@1337

Warning: Using a password on the command line interface can be insecure.
Recommendation: use the credentials file to securely provide the password.

Connected to Soc at 127.0.0.1:9042
[cqlsh 6.1.0 | Cassandra 4.1.10 | CQL spec 3.4.6 | Native protocol v5]
Use HELP for help.
cassandra@cqlsh> CREATE ROLE admin WITH PASSWORD = 'C@s5Andr41234' AND LOGIN = true AND SUPERUSER = true;
cassandra@cqlsh>
analyst@analyst:/etc/cassandra$ sudo -u cassandra CQLSH_PYTHON=/usr/bin/python3.9 cqlsh -u admin -p C@s5Andr41234

Warning: Using a password on the command line interface can be insecure.
Recommendation: use the credentials file to securely provide the password.

Connected to Soc at 127.0.0.1:9042
[cqlsh 6.1.0 | Cassandra 4.1.10 | CQL spec 3.4.6 | Native protocol v5]
Use HELP for help.
admin@cqlsh> DROP ROLE cassandra;
admin@cqlsh>
3.6. Create the TheHive Keyspace and Role
Note
Only required if you enabled authentication in Step 3.2.
A keyspace in Cassandra is analogous to a database schema in relational systems — it's the logical namespace that will hold all of TheHive's data. You'll also create a dedicated role that TheHive will use to authenticate against Cassandra, following the principle of least privilege.
-
Create the keyspace:
Info
The
replication_factor: 1is appropriate for standalone deployments. For clustered setups with multiple Cassandra nodes, increase this value to match your desired redundancy level. -
Verify it was created:
You should see
thehivelisted alongside the system keyspaces. -
Create the TheHive role and grant it access:
Example Output
admin@cqlsh> CREATE KEYSPACE thehive
... WITH replication = {
... 'class': 'SimpleStrategy',
... 'replication_factor': 1
... };
admin@cqlsh> DESCRIBE KEYSPACES;

system       system_distributed  system_traces  system_virtual_schema
system_auth  system_schema       system_views   thehive

admin@cqlsh> CREATE ROLE thehive WITH LOGIN = true AND PASSWORD = 'H1v3@dm1n2026';
admin@cqlsh> GRANT ALL PERMISSIONS ON KEYSPACE thehive TO 'thehive';
Cassandra is now fully configured and ready for TheHive to connect to it.
4. Install and Configure Elasticsearch
Elasticsearch is the indexing and search engine that sits alongside Cassandra in TheHive's stack. While Cassandra handles the heavy lifting of persistent data storage, Elasticsearch is what makes that data fast to query — powering TheHive's search, filtering, and aggregation capabilities across cases, alerts, and observables.
4.1. Install Elasticsearch
4.1.1. Add the Elasticsearch Repository
Like Cassandra, Elasticsearch isn't in the default Ubuntu package index. You'll add the official Elastic repository and its signing key.
-
Download and store the GPG signing key:
-
Add the Elasticsearch 8.x repository:
4.1.2. Install Elasticsearch
4.2. Configure Elasticsearch
Elasticsearch has two configuration files that need attention: the main elasticsearch.yml for cluster and security settings, and a JVM options file to manage memory allocation.
4.2.1. Configure /etc/elasticsearch/elasticsearch.yml
Open the file for editing:
1. Set the Cluster Name
Locate the cluster.name parameter and give your cluster a meaningful name. This line is commented out by default — make sure to uncomment it:
2. Set the Search Queue Size
The thread_pool.search.queue_size parameter controls how many search requests Elasticsearch will hold in queue before it starts rejecting new ones. For a single-node setup, 100000 is a reasonable starting point. Add or update this line:
If this queue fills up under heavy load, requests will be dropped. You can tune this value upward based on your environment's usage patterns.
3. Adjust Data and Log Paths (optional)
By default, Elasticsearch stores data and logs in the following locations:
| Parameter | Default Path |
|---|---|
path.data |
/var/lib/elasticsearch |
path.logs |
/var/log/elasticsearch |
If you're mounting a dedicated disk or want to separate these directories, update them here. Make sure any custom paths are owned by the elasticsearch user.
4. Enable X-Pack Security (strongly recommended)
X-Pack is Elastic's built-in security layer — it handles authentication, encryption, and access control. In Elasticsearch 8.x, X-Pack security features are bundled in and should be explicitly enabled:
Please Note
Do not disable X-Pack security in production. Setting xpack.security.enabled: false exposes your Elasticsearch instance to unauthenticated access from anyone who can reach port 9200. Since TheHive data lives here, this is a significant risk. The one-line config above is all it takes to keep it protected.
5. Restrict Script Types (optional)
Elasticsearch can execute custom scripts for aggregations and transformations. By default, both inline and stored scripts are allowed. For most TheHive deployments you won't need to touch this, but if you want to limit it:
Valid values are inline, stored, or none.
6. Save and close the elasticsearch.yml file when done.
4.2.2. Configure /etc/elasticsearch/jvm.options.d/jvm.options
This file controls how much memory the JVM allocates to Elasticsearch. Getting this right matters — both over-allocating and under-allocating heap can cause stability issues.
Check if the file exists; if not, create it:
Add the following, adjusting the heap values to your system's RAM:
Xms— Initial heap size allocated at startupXmx— Maximum heap size the JVM can grow to
Important:
Keep both Xms and Xmx set to the same value. This tells the JVM to pre-allocate the full heap at startup rather than growing it dynamically, which results in more predictable garbage collection and avoids performance spikes under load.
The heap size must not exceed 50% of your total system RAM. On a 12 GB system, for example, 6g is the ceiling. Beyond this threshold, the JVM can start competing with the OS for memory, leading to instability or out-of-memory errors.
4.3. Start the Elasticsearch Service
If Elasticsearch started automatically during installation (before you finished configuring it), stop it and clear any data that was initialized with the wrong settings — otherwise your configuration changes may not apply cleanly:
sudo systemctl status elasticsearch

# If running, stop it and wipe the data directory
sudo systemctl stop elasticsearch
sudo rm -rf /var/lib/elasticsearch/*
Then start, enable, and verify the service:
sudo systemctl start elasticsearch
sudo systemctl enable elasticsearch
sudo systemctl status elasticsearch
A green active (running) status confirms it's up.
Note
Elasticsearch listens on port 9200 by default.
4.4. Create a TheHive User with the Right Permissions
Note
Only required if you enabled X-Pack security in Step 4.2.
With X-Pack enabled, Elasticsearch requires authenticated connections. You'll create a dedicated thehive user that the application will use to connect, and assign it a role with the appropriate index-level permissions.
-
Create the
thehivesystem usersudo /usr/share/elasticsearch/bin/elasticsearch-users useradd thehive \ -p <thehive_user_password> -r superuserReplace
<thehive_user_password>with a secure password of your choice. -
Set a password for the built-in
elasticsuperuser (if not already set)For Elasticsearch 8.x:
This will auto-generate a password and print it to the console — make note of it, you'll need it for the API calls below.
3. Create a dedicated role for TheHive
This role grants the thehive user cluster-level management permissions and full access to all TheHive-related indices (thehive*):
curl -u elastic:<elastic_user_password> -k \
-X POST "https://localhost:9200/_security/role/thehive_role" \
-H "Content-Type: application/json" \
-d '{
"cluster": ["manage"],
"indices": [
{
"names": ["thehive*"],
"privileges": ["all"]
}
]
}' | jq
Replace <elastic_user_password> with the password set in the previous step.
A successful response looks like:
Please Note
If you need to update an existing role rather than create a new one, swap POST for PUT and specify the role name in the URL path. See the Elasticsearch role API docs for details.
4. Assign the role to the thehive user
curl -u elastic:<elastic_user_password> -k \
-X PUT "https://localhost:9200/_security/user/thehive" \
-H "Content-Type: application/json" \
-d '{
"password": "<thehive_user_password>",
"roles": ["thehive_role"]
}' | jq
A successful response:
Sample Log output
analyst@analyst:/usr/share/elasticsearch$ sudo /usr/share/elasticsearch/bin/elasticsearch-reset-password -u elastic
warning: ignoring JAVA_HOME=/usr/lib/jvm/java-11-amazon-corretto; using bundled JDK
This tool will reset the password of the [elastic] user to an autogenerated value.
The password will be printed in the console.
Please confirm that you would like to continue [y/N]y
Password for the [elastic] user successfully reset.
New value: DnXePevG_lgRBYvAmyot
analyst@analyst:/usr/share/elasticsearch$ curl -u elastic:DnXePevG_lgRBYvAmyot -k -X POST "https://localhost:9200/_security/role/thehive_role" -H "Content-Type: application/json" -d '
{
"cluster": ["manage"],
"indices": [
{
"names": ["thehive*"],
"privileges": ["all"]
}
]
}' | jq
% Total % Received % Xferd Average Speed Time Time Time Current
Dload Upload Total Spent Left Speed
100 142 100 25 100 117 380 1782 --:--:-- --:--:-- --:--:-- 2184
{
  "role": {
    "created": true
  }
}
analyst@analyst:/usr/share/elasticsearch$ curl -u elastic:DnXePevG_lgRBYvAmyot -k -X PUT "https://localhost:9200/_security/user/thehive" \
-H "Content-Type: application/json" \
-d '{
"password" : "H1v3U53r2026",
"roles" : ["thehive_role"]
}' | jq
% Total % Received % Xferd Average Speed Time Time Time Current
Dload Upload Total Spent Left Speed
100 83 100 16 100 67 124 519 --:--:-- --:--:-- --:--:-- 648
{
  "created": true
}
Elasticsearch is now configured, secured, and ready for TheHive to connect to it.
5. Install and Configure TheHive
With Cassandra and Elasticsearch in place, you're ready to install TheHive itself. TheHive packages are distributed as DEB and RPM files (as well as ZIP binaries) and are hosted on StrangeBee's secure download server. Each release is accompanied by a SHA256 checksum and a GPG signature so you can verify what you're installing before it ever touches your system.
5.1. Install TheHive
5.1.1. Download the Package and Verification Files
wget -O /tmp/thehive_5.6.0-1_all.deb https://thehive.download.strangebee.com/5.6/deb/thehive_5.6.0-1_all.deb
wget -O /tmp/thehive_5.6.0-1_all.deb.sha256 https://thehive.download.strangebee.com/5.6/sha256/thehive_5.6.0-1_all.deb.sha256
wget -O /tmp/thehive_5.6.0-1_all.deb.asc https://thehive.download.strangebee.com/5.6/asc/thehive_5.6.0-1_all.deb.asc
5.1.2. Verify File Integrity (SHA256)
Generate the checksum of your downloaded file and compare it against the official value:
Both lines should produce an identical hash. If they don't match, the file is either corrupted or has been tampered with — do not proceed, and contact the StrangeBee Security Team.
Example of a passing check:
5.1.3. Verify the GPG Signature
Download and import StrangeBee's public key, then verify the package:
wget -O /tmp/strangebee.gpg https://keys.download.strangebee.com/latest/gpg/strangebee.gpg
gpg --import /tmp/strangebee.gpg
gpg --verify /tmp/thehive_5.6.0-1_all.deb.asc /tmp/thehive_5.6.0-1_all.deb
A successful verification produces output like this:
analyst@analyst:~$ gpg --verify /tmp/thehive_5.6.0-1_all.deb.asc /tmp/thehive_5.6.0-1_all.deb
gpg: Signature made Wed 28 Jan 2026 06:28:22 PM UTC
gpg:                using RSA key 0CD5AC59DE5C5A8E0EE138493D99BB18562CBC1C
gpg: Good signature from "TheHive Project (TheHive release key) <support@thehive-project.org>" [unknown]
gpg: WARNING: This key is not certified with a trusted signature!
gpg:          There is no indication that the signature belongs to the owner.
Primary key fingerprint: 0CD5 AC59 DE5C 5A8E 0EE1  3849 3D99 BB18 562C BC1C
Confirm that the fingerprint matches exactly: 0CD5 AC59 DE5C 5A8E 0EE1 3849 3D99 BB18 562C BC1C
Note
About the GPG warning — The WARNING: This key is not certified with a trusted signature message is expected and harmless. It simply means you haven't explicitly marked StrangeBee's key as "trusted" in your local GPG keyring, which is the default state. What matters is that you see Good signature and that the fingerprint matches. If instead you see BAD signature, the fingerprint doesn't match, or the signature is missing altogether — stop and report it to StrangeBee.
5.1.4. Install the Package
Using apt-get (handles dependencies automatically — preferred):
Or using dpkg directly:
5.2. Configure TheHive
TheHive's primary configuration file lives at /etc/thehive/application.conf. This is where you'll point TheHive at your Cassandra and Elasticsearch instances, set the base URL, and configure authentication credentials.
Open it for editing:
5.2.1. Configure the Service URL
Set application.baseUrl to the address where TheHive will be accessible. This is especially important if you're using SSO or any authentication provider that performs redirects — misconfiguring this will break the login flow.
Update application.baseUrl to reflect your server's actual IP or hostname if it won't only be accessed locally.
5.2.2. Configure the Secret Key (skip if installed via DEB/RPM)
TheHive uses a secret key to sign session cookies — it's what prevents session tokens from being forged. If you installed via the DEB package (as we did here), the installer generates this key automatically and you can skip this step.
For other installation methods, generate and store a key manually:
cat > /etc/thehive/secret.conf << _EOF_
play.http.secret.key="$(cat /dev/urandom | tr -dc 'a-zA-Z0-9' | fold -w 64 | head -n 1)"
_EOF_
Then lock down the file so only the thehive service user can read it:
Note
TheHive 5.4 and later requires a minimum 32-character secret key. The command above generates a 64-character key for an extra safety margin.
5.2.3. Configure the Database and Index Connection
This section is the heart of the configuration — it tells TheHive how to connect to both Cassandra (the database backend) and Elasticsearch (the index). Update the db.janusgraph block with the credentials you created in Steps 3.6 and 4.4:
db.janusgraph {
    storage {
        backend = cql
        hostname = ["127.0.0.1"]
        # Cassandra authentication (recommended)
        username = "thehive"
        password = "<thehive_role_password>"
        cql {
            keyspace = thehive
        }
    }
    index.search {
        backend = elasticsearch
        hostname = ["127.0.0.1"]
        index-name = thehive
        # Elasticsearch authentication (recommended)
        elasticsearch {
            http {
                auth {
                    type = basic
                    basic {
                        username = "thehive"
                        password = "<thehive_user_password>"
                    }
                }
            }
        }
    }
}
Replace <thehive_role_password> with the Cassandra role password set in Step 3.6, and <thehive_user_password> with the Elasticsearch user password set in Step 4.4.
Note
If you skipped authentication for either Cassandra or Elasticsearch, simply remove the corresponding username/password lines under their respective authentication comment blocks.
For SSL-encrypted connections between TheHive and its backend services, refer to the Configure Database and Index SSL documentation.
Save and close application.conf when done.
6. Start TheHive and Complete Initial Setup
6.1. Start the TheHive Service
With Cassandra, Elasticsearch, and the application config all in place, it's time to bring TheHive online. Start the service and enable it to launch automatically on system reboot:
Verify it's running:
A green active (running) status means the service is up. If it's still showing as activating, give it a minute — TheHive performs some initialization work on first boot (setting up the JanusGraph schema, connecting to Cassandra and Elasticsearch) that can take 30–60 seconds before it's fully ready to accept requests.
Once the service is stable, open your browser and navigate to the URL you configured in application.baseUrl inside /etc/thehive/application.conf.
Note
If you configured a non-standard port or a path prefix in application.baseUrl, make sure to include both in the URL — for example, http://192.168.1.50:9000/thehive.
7. First Start
7.1. Log In with the Default Credentials
On a fresh install, TheHive is pre-seeded with a default administrator account. Use these credentials to log in for the first time:
| Field | Value |
|---|---|
| Login | admin@thehive.local |
| Password | secret |
Select Let me in to proceed.
7.2. Change the Default Password
The very first thing you should do after logging in is change this password. The default credentials are publicly known and your instance should be considered unsecured until this is done.
Create an Organization
In TheHive, an Organization is the top-level tenant unit — it's how you segment users, cases, and data. Think of it as a logical boundary representing a team, business unit, or client. Even if you're running a single-team setup, you'll still need to create at least one organization before you can do anything meaningful with the platform.
- Navigate to the Organizations view from the sidebar menu.
-
Select + to open the creation drawer.
-
Fill in the following fields:
- Name (required) — A short, identifiable name for the organization.
- Description (required) — A brief description of what this organization represents.
-
Tasks Sharing Rule (required) — Defines what happens to tasks linked to a case when that case is shared with another internal organization:
manual(default): Tasks are not shared automatically. Users must share them individually.autoShare: Tasks are shared automatically when the parent case is shared.
-
Observables Sharing Rule (required) — Defines what happens to observables when a case is shared:
manual(default): Observables are not shared automatically. Users must share them individually.autoShare: Observables follow the case and are shared automatically.
Note
Sharing rules have nuanced interactions depending on your multi-organization setup. For a full breakdown, refer to the Organizations Sharing Rules documentation.
-
Select Confirm.
-
(Optional) To set a custom logo for the organization, locate it in the Organizations view, hover over it, and select the logo icon to upload an image.
7.3. Create a User Account
User accounts control who (or what) can access TheHive — whether that's an analyst logging in through the browser, an external stakeholder accessing the portal, or an automated service calling the API.
Note: During the Platinum trial period, you can create up to five user accounts.
7.3.1 Steps
- Go to the Organizations view from the sidebar menu.
- Select the organization you want to add the user to, then select the user management option. Alternatively, hover over the organization, select the action menu, and choose Add under the Users section.
-
In the Adding a User drawer, fill in the following:
-
Type (required) — The account type determines how the user interacts with TheHive:
- Normal: For users who access TheHive via the web interface. Supports all authentication methods, and can optionally generate API keys.
- External: For users accessing TheHive through TheHive Portal — typically external collaborators or stakeholders who need limited, portal-only visibility.
- Service: For programmatic access via the API only. Service accounts authenticate exclusively with an API key and cannot log in through the web interface. Ideal for integrations, automation scripts, and connected tools like Cortex.
-
Login (required) — The identifier used to sign in. This is typically an email address, but the format depends on your authentication configuration.
- Name (required) — The display name shown throughout the interface.
- Profile (required) — The permission profile assigned to the user, which determines what they can see and do within the organization.
-
-
Select Confirm.
-
In the user accounts list, hover over the newly created user and select + to expand their account options.
-
(Optional) Select Create to generate an API key for this user — useful if the account needs to interact with TheHive programmatically.
- Select Set a new password to assign an initial password for the account.
-
Select Confirm.
TheHive is now installed, running, and ready to use. From here, you can continue with connecting Cortex for analyzer and responder capabilities, configuring MISP integration for threat intelligence sharing, or setting up additional organizations and users as your environment grows.